One of my favorite books is Chicka Chicka Boom Boom! How can you not love an alphabet book, especially one that is as catchy as this one?
My kids love to take stories a little farther than the pages we read them on. Of course the most fitting way to do that with this book is with our own coconut tree!! Here is how you can make your own:
The tree is 16 inches tall when finished.
You will need:
Green felt cut in two 20x20in pieces and one 9x9in piece
Brown felt cut into one 17x17in piece and two 6 inch circles
pillow stuffing
beanie baby filling
3 wooden 1 inch beads
brown yarn
4 pipe cleaners, any color
large eyed needle
Start by folding your first piece of green felt in half and tracing the pattern. Line up the edge of the pattern and trace again. Repeat with second piece (or you can pin them together so you are cutting through both pieces).
Fold the smaller felt piece in half and trace the smaller leaf pattern onto it. Cut out all leaves.
Pin the two large leaves together and sew along the outside edge, completely.
Fold leaves in half, then half again, finding the center. Mark the center.
Measure from the center to 6.5 inches on all leaves. Mark the spot.
Sew a casing .5 inches wide on each leaf. Don't worry about it overlaping in the center.
Cut the center with a seam ripper, pulling up the overlaping threads.
Fold two pipe cleaners in half and turn up their ends so they are rounded.
Push half of the two pipe cleaners into one side of the casing, then the other half through the casing across from it. Repeat with the second set of pipe cleaners.
Sew along the edge of the smaller leaves to give it a finished look. Sew lines down the middle of each leaf using zigzag stitch set tight.
Mark brown felt diagonally from the bottom corner to 5 inches in at the top, then cut excess off. Repeat on other side.(or use a rotary cutter as I did) The picture shows one side cut already and the other side being marked. It will now be 7 inches across the top and 17 inches across the bottom.
Fold in half and sew along the open edge.Lay with seam in center back and cut off excess fabric making a straight line. (the picture shows it turned so the outside is out. You don't need to do this at this point)
Pin the two circles to the right side of the felt on the bottom opening. Sew it closed and turn right side out.
This is what it will look like. I used two pieces for the bottom because I know it will get tossed around a lot and not treated gently. It's for reinforcement only.
Fill bottom with beanie baby beads or other weighted beads.
I put in about 2 cups to make sure it would be stable.
Stuff with pillow stuffing until its firm. You want the tree to stand tall and not slouch over.
With the open edge of large leaf down, stitch to top of tree by hand.
This is how it should look now.
Place smaller leaf on top and hand stitch it on larger leaves to tack it down.
Use a large eyed needle to thread yarn.
Begin at the back seam and pull the yarn through.
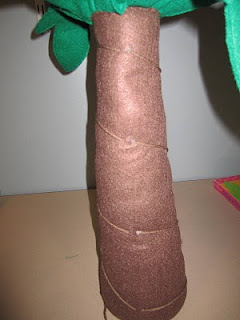
Wrap yarn around the tree and pull it through again about 2 inches lower than the first stitch a quarter turn around. Continue down the tree in this manner until you reach the bottom.
Tie a large bulky knot at the base. You will now continue back up the tree, tying bulky knots at each previous stitch.
They should look similar to this.
Tie off the yarn well at the top. Then tie on the three beads at the top to look like coconuts.
Finished tree with knots showing.
You are done!! Now add letters made out of foam or felt. I also made blue polka dots and apples out of felt and made the numbers to go along with the book Chicka Chicka 123.
Enjoy!!
I'll add the patterns for the leaves as soon as I get them scanned into my computer :)
I'll add the patterns for the leaves as soon as I get them scanned into my computer :)


No comments:
Post a Comment